
In this guide
The take sounded fine on headphones in the room. Back at the desk it doesn't. Under every sentence there's a low, steady tone, faint during conversation and obvious in the pauses, and it will sit under the whole export unless something changes.
That tone sends editors straight to a noise reduction preset. The preset learns the noise, subtracts a broad slab of the low end, and the hum goes quiet. So does the body of the voice. Consonants turn soft, the room disappears, and the recording now sounds like it came down a phone line from a tunnel.
The order that works is different. Removing buzz from audio is a measurement job before it's a filtering job, because the buzz has a specific frequency and every repair downstream depends on getting that frequency right.
Buzz is a number before it's an edit. Find the number and the repair usually picks itself.
Find the Mains Frequency Behind the Buzz
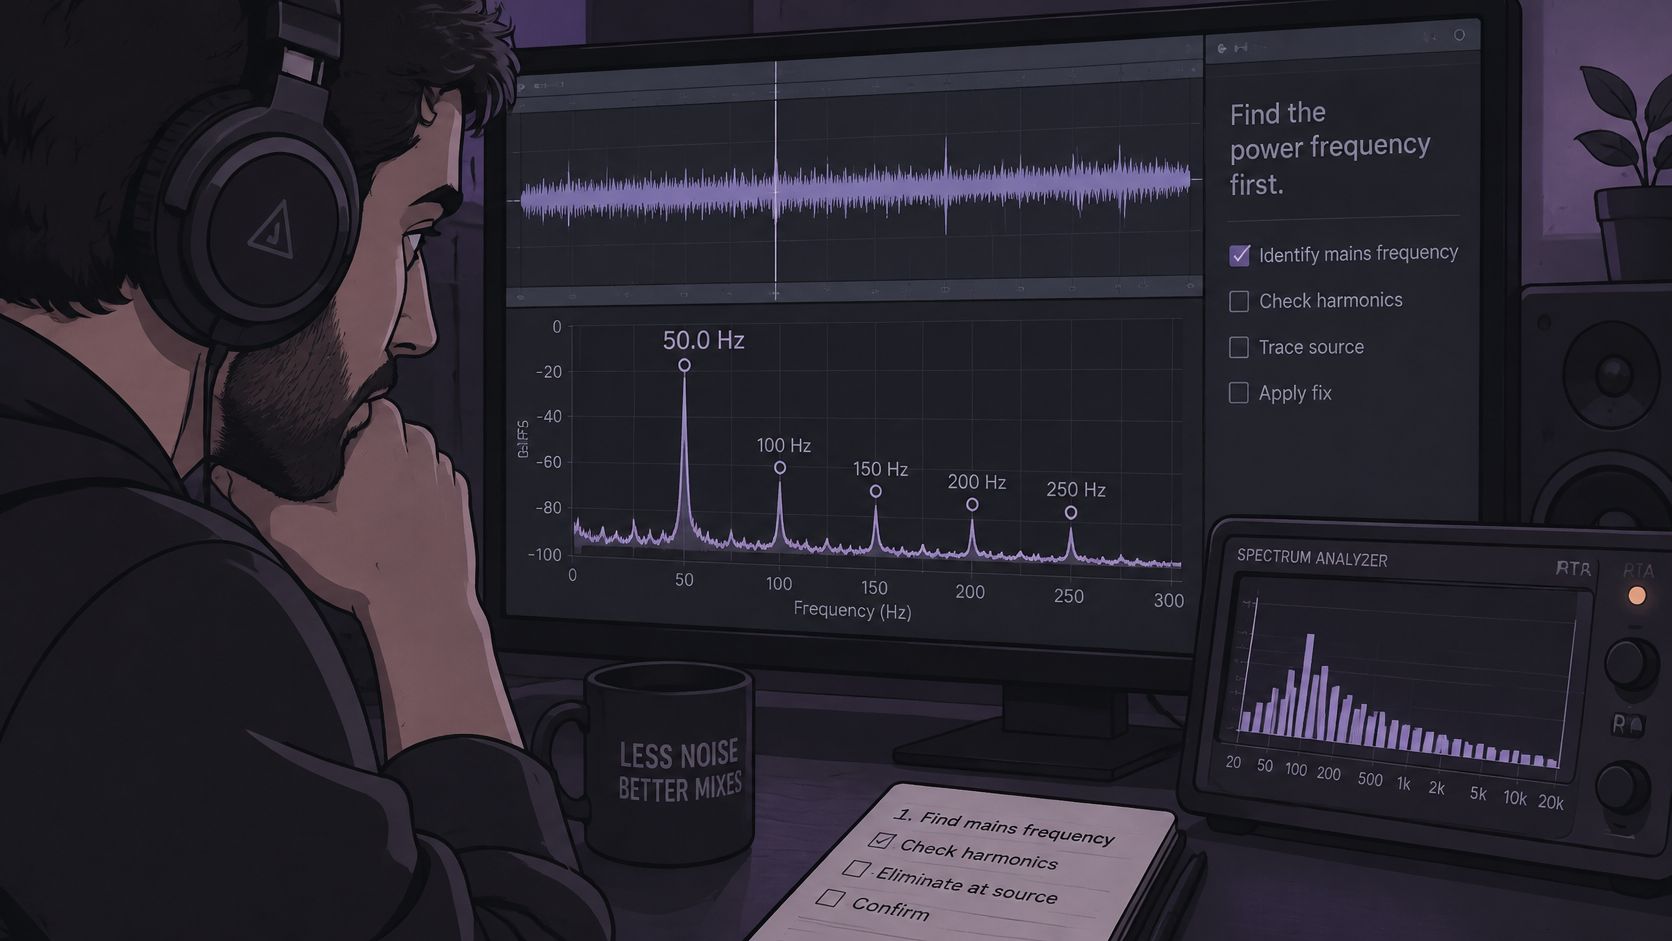
Every decision later in this process hangs on one value: the mains frequency of the power supply where the recording was made. Electrical buzz in recordings commonly comes from power-line interference, and its fundamental frequency is typically 50 Hz or 60 Hz depending on the region, with additional energy at integer multiples called harmonics, as the Essentia audio problems tutorial explains.
Those multiples are where beginners lose the thread. A 60 Hz supply produces peaks at 120 Hz and 180 Hz; a 50 Hz supply produces peaks at 100 Hz and 150 Hz. Treat only the fundamental and a thin residual buzz survives, often bright enough to irritate more than the original low tone did.
A spectrum view turns that tone into something you can point at. Open it on a two-second stretch of room tone or a pause between sentences.
| Region | Mains fundamental | Harmonics to check |
|---|---|---|
| North America | 60 Hz | 120 Hz, 180 Hz, 240 Hz |
| UK and most of Europe | 50 Hz | 100 Hz, 150 Hz, 200 Hz |
| Many other regions | 50 Hz | 100 Hz, 150 Hz, 200 Hz |
| Unknown location | Either 50 Hz or 60 Hz, confirm by measurement | Measure the spectrum before choosing a notch |
How to read the spectrum
Look for narrow, sharp spikes sitting at the mains frequency and its multiples, then watch whether a spike holds its position from the first second of the file to the last. A peak that stays put is mains interference. A peak that drifts is usually a fan changing speed, a motor, or a resonance in the room, and a fixed notch will chase it without ever catching it.
When the recording came from somewhere you can't verify the local supply, measure rather than guess. Assume 50 Hz on a 60 Hz recording and the notch lands in empty space while the buzz plays on untouched. If your editor has no spectrum display, the Saturalabs audio spectrum analyzer shows the same peaks in a browser tab.
Write down the fundamental and the two or three harmonics you can see. That short list is what every later step filters, isolates, or fixes at the wall socket.
Choose a Repair That Matches the Cause
One rule sorts almost every case: if the tone is already in the file and stays constant, treat it with a notch at the measured frequency. If the tone appears and disappears with a cable, charger, or device, the problem is the setup, and no filter will fix the next take.
Between those two ends sit the cases that need judgment. The routes below are not interchangeable, and each one has a cost.
| Method | Use it when | Main risk |
|---|---|---|
| Notch filter at the measured mains frequency | Steady 50 Hz or 60 Hz tone already in a file | A wide notch thins speech and bass |
| Text-guided separation in Saturalabs | Hum overlaps speech or music that a notch would also cut | Bleed, tone shifts, or artifacts may remain |
| Broadband noise reduction | Hiss or other broadband noise, not a tonal hum | Consonants and room tone can dull |
| Hardware or wiring fix | Buzz appears only with certain devices or connections | Does not repair a file that is already recorded |
The first two rows get confused constantly. A notch is surgical but blind to content: it removes a slice of spectrum whether or not the voice lives there. Separation makes a judgment about what the hum is and what the rest is, which helps when the tone sits inside the range of a male voice or a bass line, but it's an estimate. Bleed, tone shifts, and artifacts can remain, so the comparison with the original still decides the outcome. The audio isolation versus noise reduction guide walks through where those two approaches diverge on real material.
Broadband noise reduction is the wrong tool for a tone and the right tool for hiss, tape noise, and steady room wash. Point it at a hum and you'll spend the settings budget on frequencies that never mattered, dulling consonants in the process. For the simplest case, a single steady tone with nothing overlapping it, Saturalabs lists a free hum remover among its online audio tools, alongside a high-pass filter and a noise gate.
A wiring fix sits outside the file entirely. It stops the next recording from carrying the buzz, and it does nothing for the take already in your timeline. That's why the last question matters most: can this buzz come out of the file, or does the chain need correcting before another take?
Remove a Steady Hum with a Notch Filter
A notch filter cuts a narrow band and leaves its neighbors comparatively intact, which matches the shape of mains hum closely enough that it's the first tool to reach for. Adobe's Audition reference describes the standard approach: find the fundamental with a spectrum analyzer, apply narrow notches at the confirmed frequency and its harmonics, and raise harmonic coverage only as far as the spectrum requires, per the Audition reference. A notch filter can target up to six user-defined bands.
Six numbered moves, in this order.
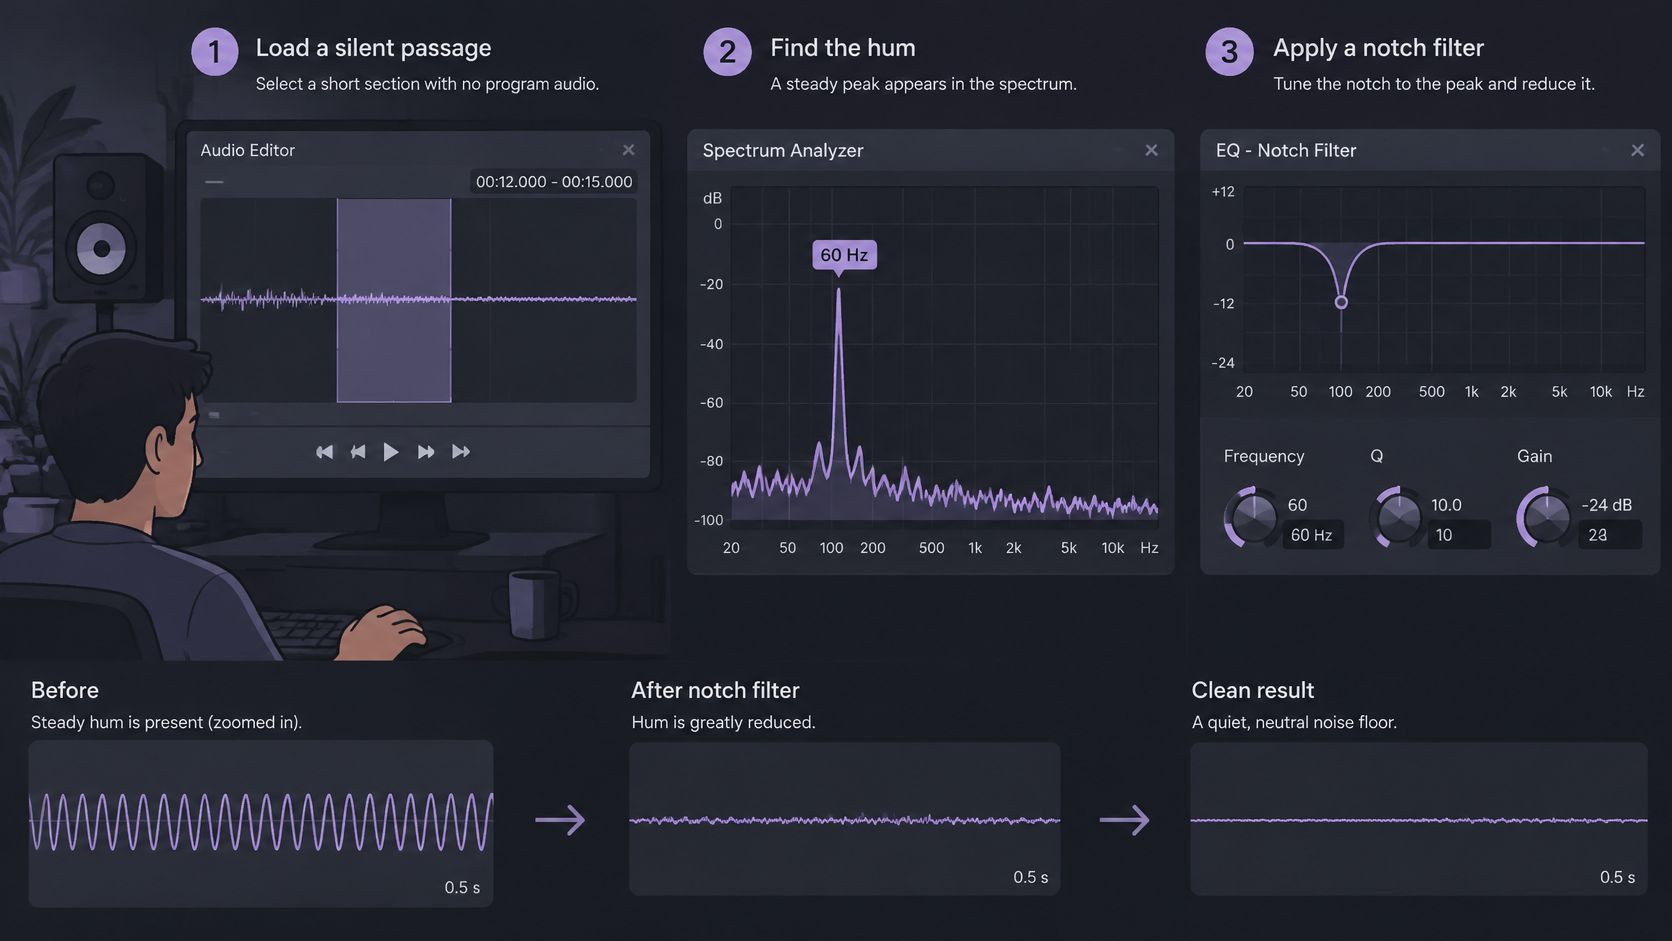
- Load a passage that contains only hum. Two seconds of a pause or the room tone before the first word. A mixed passage hides the peak behind the voice.
- Confirm the peak is steady. Watch it across the clip. A spike that holds position is mains interference; one that slides is a fan, a motor, or a room resonance, and a fixed notch will miss it.
- Set the first notch at that frequency with a high Q. Choose the narrowest bandwidth that removes the tone, then tighten further only if the buzz survives. Higher Q means a longer impulse response, so stop before the filter starts to ring.
- Add harmonics only where peaks remain. Treat 120 Hz and 180 Hz on a 60 Hz system, or 100 Hz and 150 Hz on a 50 Hz one, and skip any multiple the spectrum no longer shows after the fundamental is gone. An unnecessary notch just costs you signal.
- Audition consonants, bass notes, and sustained instruments after each change. Clipped s and t sounds, thin bass, and a hollow or phasey tone on long notes all point to too much width or too much attenuation.
- Render a short difficult passage and compare it with the untreated version. Switching between the two catches damage the ear misses when it hears a cleaned track alone. Once the passage survives, process the whole file.
Where a notch filter goes wrong
Two failure modes account for most bad de-humming. Excessive width pulls out wanted low-frequency content along with the tone, so a voice loses weight and consonants turn mushy. Excessive attenuation, or too many stacked bands, leaves the recording hollow and phasey, as though the speaker moved behind a door.
The technical limit is selectivity against time-domain behavior. A highly selective filter needs a longer impulse response, and long impulse responses ring, which is audible as a metallic tail on sustained notes. The right setting balances a little residual buzz against that resonance.
Don't assume every low tone is mains hum either. Fan noise, lighting interference, cable shielding faults, and instrument electronics can produce tones at other fundamentals or with no stable pitch at all. Confirm before you cut.
The result to aim for is modest and specific: the buzz drops out of the pauses, speech keeps its consonants, and the room tone is still there.
Isolate the Buzz in Saturalabs and Keep the Right Output
Notch filtering assumes the hum is separable from the wanted sound by frequency alone. When the tone overlaps a voice, a bass, or a sustained note, the better test is a text-guided separation pass, where you describe one audible source and let the tool estimate it. The workflow has three steps: add audio or video, describe one sound, then compare both tracks.
- Add the file. MP3, WAV, MP4, or MOV up to 50 MiB (52.43 MB). Audio and video both work.
- Describe one sound. Name a single target rather than a list, because each pass targets one described source. Prompts that fit this problem: "remove low-frequency hum/buzz", "electrical hum", "60 Hz buzz".
- Choose the output that matches the goal. For a spoken recording, describe spoken voice and audition Isolated sound. To lift hum out of a music mix, describe the hum and audition Background audio, which is the remaining recording with that target removed.
- Compare a difficult passage with the original. Listen for missing words, softened consonants, or a shift in tone on held notes.
- Read the credit cost on the results screen before downloading the chosen WAV. The figure is shown before the file leaves the browser.
What each output means: Isolated sound keeps the sound named in the prompt. Background audio is everything else. Pick the one you actually plan to use before you download.
A video upload returns separated audio tracks, not a finished video, so the WAV has to be aligned against the picture in your editor afterward. If the hum sits under dialogue, that alignment work is small; if it sits under a music performance, check the sync at the head and tail before exporting.
Two side notes worth knowing. Separation is an estimate of the target, not a guarantee of recovering it, so a hard phrase always gets compared against the original first. And if the goal shifts to a karaoke backing, that's a separate pass with a different prompt: isolate vocals and choose Background audio. Guidance on phrasing a target more precisely lives in the audio isolation prompts guide.
Listen for Artifacts Before You Export
The rule that governs this stage is blunt: if a word disappears, that passage stays on the original master. A silent pause is not the goal. A sentence that still sounds like the speaker is.
So compare three things, not two. The original, the isolated target, and the background output. Cycling among all three tells you whether damage came from the tool or was already in the source.
| Symptom | Likely cause | Action |
|---|---|---|
| Metallic ringing on sustained notes | Overly selective notch or over-processing | Narrow the band or reduce the attenuation |
| Dull or missing s, f and t sounds | Target overlaps speech consonants | Keep the original for that passage |
| Watery or swirling background | Separation bleed | Compare Background audio with the original |
| Hollow or empty pauses | Room tone removed with the hum | Use the cleaned track only where it sounds natural |
| Clicks at edits | Passage boundaries misaligned | Apply a short fade at each cut |
Even a surgical repair earns a comparison. An NYU demonstration of notch filtering reports that a wide FIR notch attenuated the speech waveform while a narrower IIR notch preserved its shape better because fewer neighboring frequencies were touched, and the same notch filter demonstration notes that a targeted notch still affects speech when the unwanted tone overlaps important signal energy.
Quietness doesn't prove intelligibility. One reported speech restoration system averaged a 4.65% character error rate with noise suppression alone, while a voice-conversion-enhanced version reached 18.38%, according to recent speech restoration research. The more elaborate stage made speech harder to recognize, which is exactly why the ear has to judge the result and not a noise meter.
The three listening passes
Play the speech consonants first, listening for clipped s, f, and t sounds. Then play a sustained note or a held vowel and listen for tremolo or flutter. Finally play the pauses and check for watery swirl, metallic residue, or a silence that sounds too clean.
Overlapping sources, clipping, strong microphone wind, and heavy reverberation can all limit the result, so a passage recorded too hot may never recover its detail. That's a reason to keep the untreated file, not a reason to push a harsher setting. If restoration is part of a wider cleanup chain, the online audio restoration guide places de-humming in the right sequence alongside de-clipping and noise reduction.
Fix the Source When Software Cannot Recover It
If the buzz was caused by the recording setup rather than the file, no amount of processing settles it. A one-device-at-a-time test locates it faster than any preset. A practical guide to ground loops recommends building the system up one connection at a time and monitoring after each, starting by disconnecting the source interconnect and testing the interface, computer, monitors, and external feeds separately, as the Sound on Sound ground loop guide describes.

When the noise vanishes as soon as a laptop charger is unplugged, or when the rig runs on battery power, the power path is implicated. That's useful information and it costs nothing to obtain.
The wiring fixes that actually change the recording
Power every interconnected piece of audio gear from one outlet or distribution point, which minimizes the voltage differences that drive ground loops. Route signal cables away from power supplies and transformers, and cross unavoidable power runs at right angles rather than running parallel to them. Where both devices support balanced connections, use XLR or TRS; the published guide reports common-mode rejection of roughly 60 to 80 dB for balanced lines, though real-world rejection depends on the equipment and cable quality.
For an unbalanced connection that stays noisy, an audio isolation transformer or a DI box with a ground-lift function is the legitimate fix. Never disconnect the protective earth on a mains plug. That converts an audio annoyance into a shock hazard, and it doesn't solve the loop anyway.
Verify the repair by recording several seconds of silence at the same gain and cable positions, measuring the noise floor before and after, and checking that the wanted signal kept its level and low end. If the buzz persists, inspect USB devices, dimmers, LED drivers, and nearby transformers before stacking more filters on the file.
Decide Whether the Cleaned Track Is Ready to Use
Ready means three checks pass, not one.
- Silence check: the pauses no longer carry the steady tone you measured at the start, whether that was 50 Hz or 60 Hz.
- Comparison check: a difficult passage still matches the untreated original when you switch between them.
- Full-play check: a complete listen on speakers and again on headphones turns up no new ringing, no swallowed words, and no room tone that drops out between edits.
If any check fails, don't re-run the whole file with a harsher setting. Go back one move instead: retune the notch to the measured fundamental and the harmonics you confirmed, run a single separation pass on a shorter clip, or correct the power path and re-record the take. Any passage where a word disappears stays on the original master.
A short test is a sensible next step before a full project upload. Downloads require an account and sufficient credits. Check the cost shown on the results screen and the current pricing page before choosing a download.
Saturalabs takes a single MP3, WAV, MP4, or MOV of up to 50 MiB (52.43 MB), lets you type one plain-language target such as "electrical hum" or "60 Hz buzz", and returns Isolated sound and Background audio for the same passage so you can hear what survived. It's a practical way to test whether the buzz can be lifted out of a recording you can't re-record, with the credit cost shown on the results screen before you download. Visit Saturalabs and run one short clip through it, then judge the result against your original before processing anything longer.